How I Effortlessly Converted My Slides into Stunning Pictures: A Step-by-Step Guide
As someone who has navigated the world of presentations, I know firsthand the struggle of wanting to share my slides in a more versatile format. There’s something incredibly satisfying about transforming those carefully crafted slides into striking images that can be easily shared, embedded, or even printed. In this digital age, where visual content reigns supreme, the ability to convert slides into pictures opens up a realm of possibilities for enhancing communication and storytelling. Whether you’re looking to create eye-catching social media posts, add flair to reports, or preserve your work for posterity, understanding how to effectively convert slides into images can elevate your content-sharing game. Join me as we explore the transformative process of turning static presentations into dynamic visuals, unlocking new ways to connect with our audience.
I Personally Tried Converting Slides into Pictures and Share My Honest Recommendations Below

KODAK Slide N SCAN Film & Slide Scanner Digitizer with 5” LCD Screen, Quickly Convert Negatives & Slides to Digital 22MP JPEG Photos, Compatible with 135, 126 and 110 Film & Slides

DIGITNOW! 135 Film Negative Scanner High Resolution Slide Viewer,Convert 35mm Film &Slide to Digital JPEG Save into SD Card, with Slide Mounts Feeder No Computer/Software Required
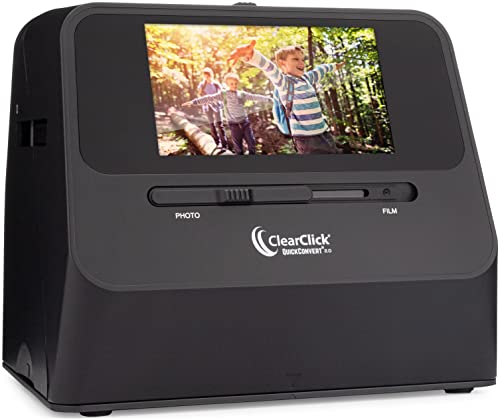
ClearClick QuickConvert 2.0 Photo, Slide, and Negative Scanner – Scan 4×6 Photos & 35mm, 110, 126 Film – No Computer Required – 22 MegaPixels
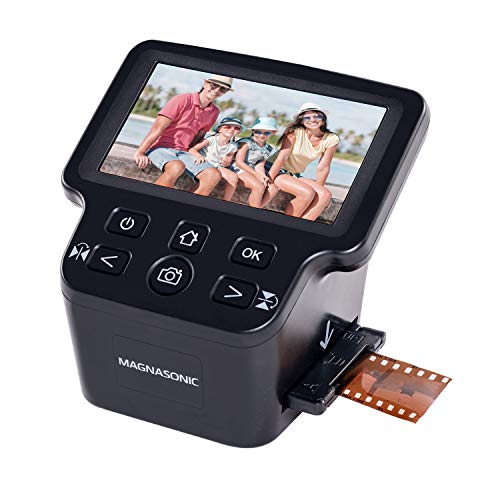
Magnasonic All-in-One 24MP Film Scanner with Large 5″ Display & HDMI, Converts 35mm/126/110/Super 8 Film & 135/126/110 Slides into Digital Photos, Built-in Memory (FS71)
1. KODAK Slide N SCAN Film & Slide Scanner Digitizer with 5” LCD Screen, Quickly Convert Negatives & Slides to Digital 22MP JPEG Photos, Compatible with 135, 126 and 110 Film & Slides
As I delve into the KODAK Slide N SCAN Film & Slide Scanner Digitizer, I can’t help but feel a wave of nostalgia wash over me. This product is not just a scanner; it’s a bridge to the past, allowing me to preserve cherished memories trapped in old film and slides. The ability to convert negatives and slides into stunning 22MP JPEG photos is a game-changer for anyone looking to revitalize their photo collection. It’s a fantastic solution for those who have boxes of old photos collecting dust in the attic, waiting to be seen again.
One of the standout features of this scanner is the impressive 5” LCD display. This large, crystal-clear screen provides a wide viewing angle, making it easy to preview and edit photos instantly. I find this particularly appealing because it allows me to share these moments with family and friends in real-time, evoking laughter and joy as we reminisce together. Additionally, the gallery mode transforms the scanner into a chic digital picture frame, adding a touch of elegance to my home or office décor.
Convenience is another strong suit of the KODAK Slide N SCAN. The quick-feeding tray technology means I can load my film and slides without any hassle, making the entire scanning process fast and straightforward. This is especially beneficial for those of us who may not be tech-savvy or who simply want to enjoy the experience without getting bogged down by complicated setups. The inclusion of multiple adapters for different film types—135, 110, 126, and even 50mm slides—ensures that I can tackle any project without needing to buy extra accessories. Plus, the cleaning brush and USB/HDMI cables are thoughtful additions that enhance the overall user experience.
Editing photos has never been easier, thanks to the advanced capture software built into the device. With just a single touch, I can enhance, resize, and convert my photos with the easy ‘Scan’ button. There’s no need to navigate through complex screens or settings, which takes the stress out of digitizing my memories. I can easily choose the film type, adjust color and brightness, and even assign date and time, allowing me to keep everything organized and accessible.
Finally, the KODAK Slide N SCAN is super chic and incredibly compatible. It handles all my old slides and negatives with ease and supports SD or SDHC cards up to 32GB, though I’ll need to purchase those separately. The seamless connection to any Type-C USB-enabled computer makes transferring my digitized photos a breeze. The design is not only functional but also complements my home décor beautifully, ensuring that this device doesn’t just serve a purpose but also adds aesthetic value.
Feature Benefit 22MP JPEG Conversion High-quality digital images from old film and slides. 5” LCD Display Instant preview and editing of photos. Quick-Feeding Tray Technology Fast and easy loading of film and slides. Advanced Capture Software Simplified editing and conversion process. Multi-Format Compatibility Handles various film types without additional purchases.
I find the KODAK Slide N SCAN Film & Slide Scanner Digitizer to be an invaluable tool for anyone looking to preserve their photographic history. It combines functionality with ease of use, making it a must-have for both photography enthusiasts and casual users alike. By investing in this scanner, I’m not just purchasing a product; I’m embracing a chance to relive and share my precious memories. If you’re in a similar position, I highly recommend giving this product serious consideration—it could very well be the key to unlocking your past.
Get It From Amazon Now: Check Price on Amazon & FREE Returns
2. DIGITNOW! 135 Film Negative Scanner High Resolution Slide Viewer,Convert 35mm Film &Slide to Digital JPEG Save into SD Card, with Slide Mounts Feeder No Computer/Software Required
As someone who appreciates the nostalgia of film photography and the convenience of digital technology, I am genuinely excited to dive into the analysis of the DIGITNOW! 135 Film Negative Scanner. This product is a game-changer for anyone looking to preserve their cherished memories captured on 35mm film and slides. The ability to convert these precious images into digital JPEG files not only breathes new life into old photographs but also makes them easily accessible and sharable with family and friends.
One of the standout features of the DIGITNOW! scanner is its adjustable rapid slide feeder. This thoughtful design allows for a seamless scanning experience, enabling me to digitize multiple slides in quick succession without the hassle of manual handling. It’s perfect for those of us who may have boxes of old slides and negatives waiting to be transformed into digital format. The promise of simple mouse clicks to copy, move, and duplicate these files further eliminates the frustration often associated with managing old media.
The high-resolution scanning capability of 5/10 Mega Pixels is another impressive aspect. With the ability to scan at 1800 DPI, I can trust that the quality of my images will be preserved during the digitization process. This resolution is particularly important for anyone who values the details in their photographs—be it the intricate textures of a landscape or the delicate expressions captured in a family portrait. Having the option to save these scans directly onto an SD card (up to 32GB SDHC) or my computer provides incredible flexibility in how I manage and store my digital collection.
Moreover, the USB 2.0 interface and Video Cable to TV out feature are incredibly user-friendly. The ability to connect the scanner to a TV allows me to showcase my digitized memories in a larger format, enhancing the experience of revisiting those moments with loved ones. I appreciate that the operation is compatible with various systems, including Windows XP, VISTA, 7, 8, 10, and Mac OS, making it a versatile choice for a wide range of users.
The built-in 2.4-inch TFT LCD screen is another thoughtful touch, providing a clear and convenient display for adjusting settings and viewing scans in real-time. This ensures that I can monitor the quality of my scans as I digitize, giving me peace of mind that I am capturing my memories accurately. The overall design is intuitive, which means I can get started without needing extensive technical knowledge or additional software, making it approachable for everyone, regardless of their tech-savvy level.
Feature Description Adjustable Rapid Slide Feeder Allows for quick and easy digitization of multiple slides. High Resolution Scanning 5/10 Mega Pixels, 1800 DPI for detailed image capture. Storage Options Save scans to SD card (up to 32GB) or computer. USB 2.0 Interface Connects easily to computers and TVs for versatile usage. 2.4 inch TFT LCD Screen Convenient display for monitoring scans and adjustments. Compatible Operating Systems Works with Windows XP, VISTA, 7, 8, 10, and Mac OS.
the DIGITNOW! 135 Film Negative Scanner is an excellent investment for anyone looking to preserve their film memories. Its combination of high-resolution scanning, user-friendly features, and the convenience of direct saving options truly enhances the digitization process. I can’t help but feel that this product is a must-have for film enthusiasts, photographers, and families looking to cherish their past. If you’re ready to transform your slides and negatives into a format that can be easily shared and enjoyed for years to come, I highly recommend considering this scanner as your go-to solution. Don’t let those precious memories fade away—take the step to digitize them today!
Get It From Amazon Now: Check Price on Amazon & FREE Returns
3. ClearClick QuickConvert 2.0 Photo, Slide, and Negative Scanner – Scan 4×6 Photos & 35mm, 110, 126 Film – No Computer Required – 22 MegaPixels
As someone who has explored various ways to preserve memories, I can’t help but feel genuinely excited about the ClearClick QuickConvert 2.0 Photo, Slide, and Negative Scanner. In today’s digital age, it’s essential to keep our cherished memories safe and accessible. This scanner offers a straightforward and efficient solution for converting old photos, slides, and negatives into digital formats without the hassle of complicated setups or the need for a computer. What I love most about this product is its user-friendly design, making it perfect for anyone, regardless of their tech-savviness.
The standout feature of the QuickConvert 2.0 is its remarkable speed. It takes only 2-3 seconds to scan a photo, slide, or negative, which means I can quickly digitize my entire collection without spending an entire weekend on the task. The fact that it scans 4×6 photos or smaller means that I can easily preserve those smaller, precious memories that often get overlooked. Plus, the ability to adjust the scan size with just the press of a button is a thoughtful touch that adds to the convenience.
One of the most appealing aspects for me is that this scanner does not require a computer or any complicated drivers. I simply turn it on and start scanning, which is a huge plus for those who might feel intimidated by technology. The built-in rechargeable battery allows for cord-free scanning, giving me the freedom to digitize my memories wherever I please, without being tethered to a wall outlet. However, I do need to remember to charge it fully before using it, which is a small price to pay for such portability.
The quality of the scans is impressive, with an interpolated resolution of 22 MegaPixels. This means my digital copies will maintain a high level of detail, allowing me to enjoy my photos in their full glory. The scanner saves images as JPEG files on an SD memory card, making it easy to transfer and share my newly digitized memories with friends and family. The included 5″ instant preview LCD screen is a fantastic feature, allowing me to review my scans immediately to ensure they meet my expectations.
Moreover, the QuickConvert 2.0 also supports scanning without the need to remove photos from albums or mounts. This feature is especially appealing to me because it minimizes the risk of damaging my original photos while I digitize them. However, it’s worth noting that the scanner does not support 5×7 photos, so I need to keep that in mind when planning my digitization project.
Finally, the 2-year warranty and tech support from ClearClick, a USA small business, gives me peace of mind. Knowing that I can reach out for assistance if I encounter any issues is incredibly reassuring, especially when investing in a product that aims to preserve my most treasured memories.
In summary, the ClearClick QuickConvert 2.0 Photo, Slide, and Negative Scanner presents a fantastic opportunity for anyone looking to digitize their old photos, slides, and negatives. Its combination of speed, ease of use, and quality makes it an excellent choice for individuals like me who value their memories and want to keep them safe in a digital format. If you’re considering a way to make your memories last a lifetime, I highly recommend giving this scanner a try.
Feature Description Scanning Speed 2-3 seconds per photo, slide, or negative Scan Size 4×6 photos or smaller (adjustable) Resolution 14 MegaPixels (22 MegaPixels interpolated) File Format JPEG files saved on SD memory card Power Source Built-in rechargeable battery for cord-free scanning Preview Screen 5″ instant preview LCD screen Warranty 2-year warranty & tech support
Get It From Amazon Now: Check Price on Amazon & FREE Returns
4. Magnasonic All-in-One 24MP Film Scanner with Large 5″ Display & HDMI, Converts 35mm/126/110/Super 8 Film & 135/126/110 Slides into Digital Photos, Built-in Memory (FS71)
I recently stumbled upon the Magnasonic All-in-One 24MP Film Scanner, and I must say, it has completely transformed my approach to preserving old memories. This scanner is specifically designed for anyone who has cherished film negatives or slides tucked away in boxes, gathering dust. The ability to convert 35mm, 110, 126, and even Super 8 film into high-resolution digital JPEG files is simply remarkable. As someone who values nostalgia and wants to keep those precious moments alive, I found this product to be a game-changer.
The standout feature for me is its impressive 24MP resolution. This means that the images I scanned came out crystal clear, capturing every detail with stunning accuracy. I was amazed at how quickly I could convert my old films and slides into digital formats. The scanner allows for rapid scanning—each image takes less than five seconds! This efficiency is perfect for those of us who may have a significant collection of old photos to digitize. I can’t stress enough how this feature saves time while delivering quality results.
One of the most user-friendly aspects of the Magnasonic scanner is its large 5″ LCD display. This screen makes it extremely easy to view the films and slides during scanning. I found it incredibly satisfying to see my old memories pop up on the screen in real-time. Plus, for those who want to share their memories on a larger scale, there’s an option to connect the scanner to a TV or monitor via HDMI. Although the HDMI cable isn’t included, the versatility it offers is something I truly appreciate.
The built-in memory and SD card slot are also significant advantages. With 128MB of internal memory and the capacity for an additional 128GB via an SD card, I felt relieved knowing that I could scan and save a lifetime of photos without worrying about running out of space. This feature allows me to work on my scanning projects at my own pace, knowing that I have ample storage available. It’s perfect for anyone who might be tackling an extensive collection of family memories.
Another major bonus is that I don’t need a computer to operate this scanner. The convenience of not having to deal with complicated software or driver installations is a huge relief. Instead, I can directly adjust brightness and RGB color settings right on the scanner. This ease of use means that anyone, regardless of tech-savviness, can navigate the device without frustration. The straightforward setup ensures that even first-time users can operate it with ease.
In summary, the Magnasonic All-in-One 24MP Film Scanner is more than just a tool; it’s a bridge to the past, allowing me to effortlessly convert and preserve my cherished memories. If you have old films and slides that deserve to be seen and cherished once more, I strongly recommend considering this fantastic scanner. It’s an investment in preserving your family’s history and ensuring those moments live on for future generations. Don’t let your precious memories fade away; take the leap and bring them back to life with the Magnasonic scanner!
Feature Description Resolution 24MP digital JPEG files for high-quality images Display 5″ LCD screen for easy viewing Memory 128MB internal memory and SD card slot for up to 128GB Connectivity HDMI output for larger displays (cable not included) Ease of Use No computer needed; direct adjustments on the scanner Scanning Speed Less than 5 seconds per scan
Get It From Amazon Now: Check Price on Amazon & FREE Returns
Why Converting Slides Into Pictures Has Helped Me
Converting slides into pictures has been a game changer for me, especially when it comes to sharing my presentations with others. I often find myself in situations where I need to send a quick update or share my ideas without the hassle of preparing a full presentation. By converting my slides into images, I can easily attach them to emails or upload them to social media, making my content more accessible to a wider audience.
Another benefit I’ve experienced is the ease of creating visually appealing content for various platforms. I love using my slides as images for blog posts or social media updates. The visuals are striking and can grab attention much faster than plain text. Plus, having a collection of high-quality images from my presentations allows me to repurpose content creatively, saving me time and effort in the long run.
Lastly, converting slides into pictures has improved my ability to archive and organize my work. I can store these images in a dedicated folder, making it simple to revisit past presentations without sifting through lengthy files. This organization helps me track my progress over time and serves as a source of inspiration for future projects. Overall, this simple conversion process has enhanced my productivity and creativity in ways I never anticipated.
Buying Guide: Convert Slides Into Pictures
Understanding My Needs
When I set out to convert my old slides into pictures, I first had to identify my specific needs. I wanted high-quality images that I could easily share and preserve. I considered the volume of slides I had, the quality of the originals, and how I planned to use the converted images. Reflecting on these aspects helped me narrow down my options.
Types of Conversion Methods
There are several methods I explored for converting slides into pictures. I found that I could choose between manual scanning, professional services, and digital converters. Each method has its pros and cons. I weighed the cost, time, and quality of output for each option. I found that understanding these methods was crucial in making an informed decision.
Evaluating Quality
Quality is paramount when converting slides. I looked for methods that provided high resolution and color accuracy. I paid attention to the details, such as the maximum resolution supported and the color reproduction capabilities. Ensuring that the final images would do justice to my original slides was a priority for me.
Considering Cost
Budget played a significant role in my decision-making process. I compared the costs associated with different methods, including the purchase of equipment or the fees for professional services. I made sure to factor in any hidden costs, such as shipping fees for sending slides to a service. This helped me stay within my budget while still achieving quality results.
Ease of Use
I wanted a method that was user-friendly. I considered how easy it would be to set up and operate the equipment or service I chose. Whether it was a scanner or a digital converter, I read reviews and watched tutorials to gauge the user experience. The last thing I wanted was a complicated process that would lead to frustration.
Checking for Compatibility
Compatibility was another important factor for me. I needed to ensure that the equipment or service I chose could handle the specific type of slides I had. I took the time to research whether the converters supported my slide formats and if they could connect to my computer or other devices seamlessly.
Reviews and Recommendations
To make a well-informed choice, I spent time reading reviews from others who had similar experiences. I looked for feedback on image quality, customer service, and overall satisfaction. This helped me get a sense of what to expect and guided me toward methods that had a solid reputation.
Final Thoughts
In the end, converting slides into pictures was a rewarding experience for me. By carefully considering my needs, exploring various methods, and evaluating quality, cost, and ease of use, I was able to find a solution that worked. I now have beautiful digital images that I can cherish and share for years to come. Taking the time to research and plan made all the difference in my conversion journey.
Author Profile

-
I’m David Eure, an entrepreneur and urbanist with a deep-rooted passion for building cities that work better for everyone. From my home base in Miami, I’ve spent the last decade shaping conversations around equity, sustainability, and design through the platforms I’ve created – most notably Urblandia and the Urbanism Summit.
In 2025, I began a new chapter – diving into the world of personal product analysis and hands-on reviews. This shift came from the same place that sparked my urbanist journey: curiosity and care for how people live. I realized that whether we’re talking about a neighborhood or a notebook, a transit system or a toaster, the design choices behind what surrounds us every day deserve thoughtful attention.
Latest entries
- November 25, 2025Personal RecommendationsWhy I Switched to a 0-90 Ohm Fuel Gauge: My Expert Insights and Personal Experience
- November 25, 2025Personal RecommendationsWhy I Trust 0 Gauge Jumper Cables: My Personal Experience and Expert Insights
- November 25, 2025Personal RecommendationsWhy I Switched to 0 Gauge Ring Terminals: My Expert Experience and Insights
- November 25, 2025Personal RecommendationsWhy I Switched to 0 Gauge Silicone Tunnels: A Personal Journey and Expert Insights